
Upload single and multiple files using Node.JS and Nest.JS
File uploads are a common feature in web applications, allowing users to
share documents, images, and other media. Node.js, with its event-driven,
non-blocking I/O model, is an excellent choice for handling file uploads.
Nest.js, a powerful framework built on top of Node.js, provides a
structured and scalable approach for building server-side applications,
including file upload functionalities.
In this blog post, we will explore how to upload both single and multiple
files using Node.js and Nest.js, leveraging popular libraries to
streamline the process.
Prerequisites
Before diving into the code, ensure you have the following installed:1. Node.js: Download and install Node.js from the official website.
2. Nest.js: Install Nest.js CLI globally using npm:
3. A basic understanding of JavaScript and Nest.js concepts.
Setting up the Project
Let's begin by creating a new Nest.js project. Open your terminal and run:Handling Single File Uploads
For handling file uploads, we'll use the @nestjs/platform-express module. It's a Nest.js module for handling multipart/form-data, making it easy to process file uploads.Step 1. Install Dependencies
Step 2: Implement the File Upload Endpoint
You should have a controller 'app.controller.ts'. You need to create 2 endpoints, one for single upload and other for multiple uploads.Let's write the codes:
app.controller.ts
Let's understand the above codes
This code defines a controller endpoint at the route /multiple with a POST HTTP method. The endpoint is designed to handle multiple file uploads.
-
@Post('/multiple'): This is a decorator indicating that the associated method (uploadFiles) should handle HTTP POST requests to the endpoint '/multiple'. -
@UseInterceptors(FilesInterceptor('files')): This is another decorator, which specifies that an interceptor should be used for this method. In this case, the interceptor isFilesInterceptor, and it expects a parameter named 'files'. Interceptors in NestJS are used to process requests and responses before they reach the route handler or after they leave it. -
async uploadFiles(@UploadedFiles() files:
                                Array<Express.Multer.File>)
: This is the methoduploadFileswhich is marked asasyncsince it performs asynchronous operations. The method takes one parameterfiles, which is decorated with@UploadedFiles(). This decorator is used to inject uploaded files into the method. Thefilesparameter will hold an array ofExpress.Multer.Fileobjects, representing the uploaded files. -
The method creates a
reqobject containing thefilesarray and aprospectId, which is hardcoded as1234. It is preparing the data to be sent to theappServicefor further processing. -
return await this.appService.getUrls(req);: The method awaits the response from theappService.getUrlsmethod. It seems that this method is part of a service (appService) responsible for handling business logic and interacting with other components.
So, in summary, this code represents an API endpoint that handles POST
requests to '/multiple'. The endpoint is expecting to receive
files with the field name 'files', which will be processed by an
interceptor (presumably to handle file uploads). The uploaded files and a
hardcoded prospectId are then passed to the appService to
fetch URLs (possibly related to the uploaded files).
For the second endpoint, represents an API endpoint that handles POST requests to '/single'. The endpoint is expecting to receive a single file with the field name 'file', which will be processed by an interceptor (presumably to handle file upload). The uploaded file and a hardcoded prospectId are then passed to the appService to fetch URLs (possibly related to the uploaded file).
Let's write the service to return the correct response to the user:
app.service.ts
Let's understand the above codes
In summary, the getUrls function takes an input object uploadData containing an array of files and a prospectId, and it generates an array of URLs for each file. The URLs are constructed based on the provided prospectId, the current timestamp, and the original file names. The function then returns an object containing the array of URLs and the prospectId.app.dto.ts
Let's understand the above codes
By using these classes, the code achieves type safety, making it easier to handle and understand the data being passed around the application. Additionally, when using an IDE or TypeScript-aware editor, developers will get type hints and autocompletions for properties of these objects, reducing the likelihood of type-related errors in the code.Upload the files
Here are the curl URLs to use the above endpoints:Curl:
Response:
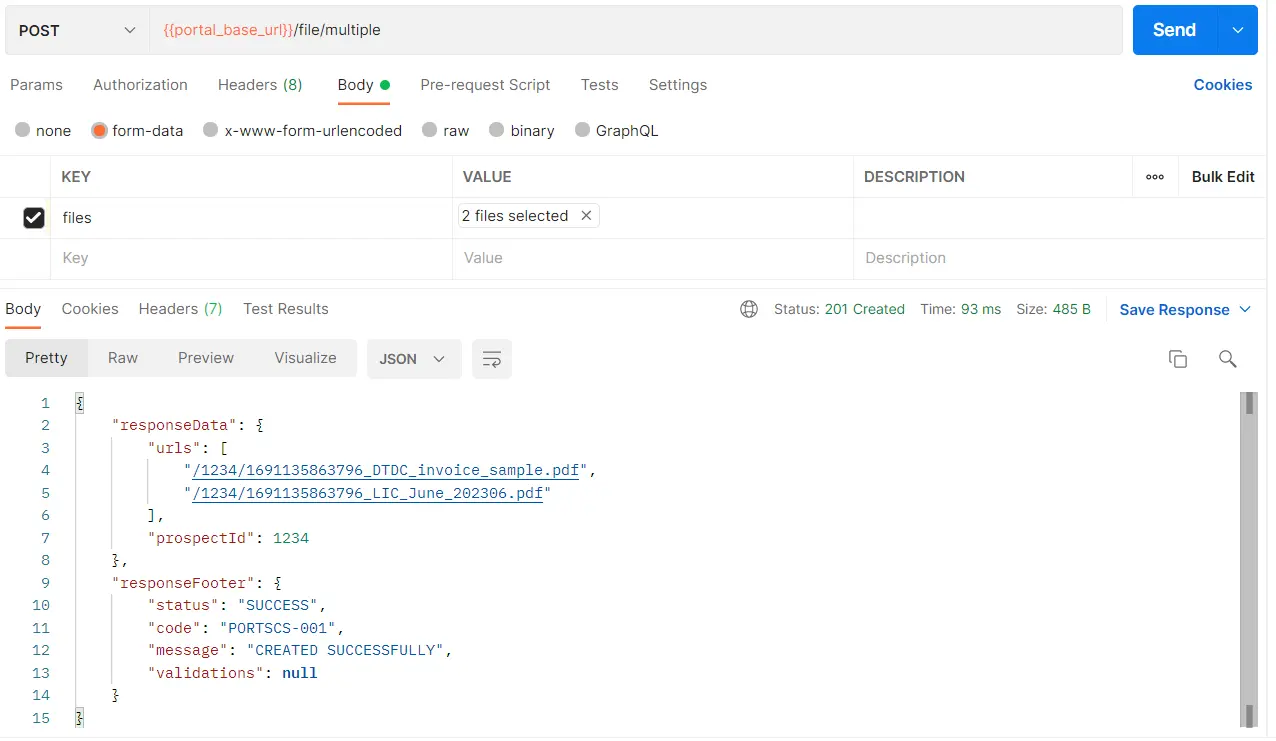
Response:
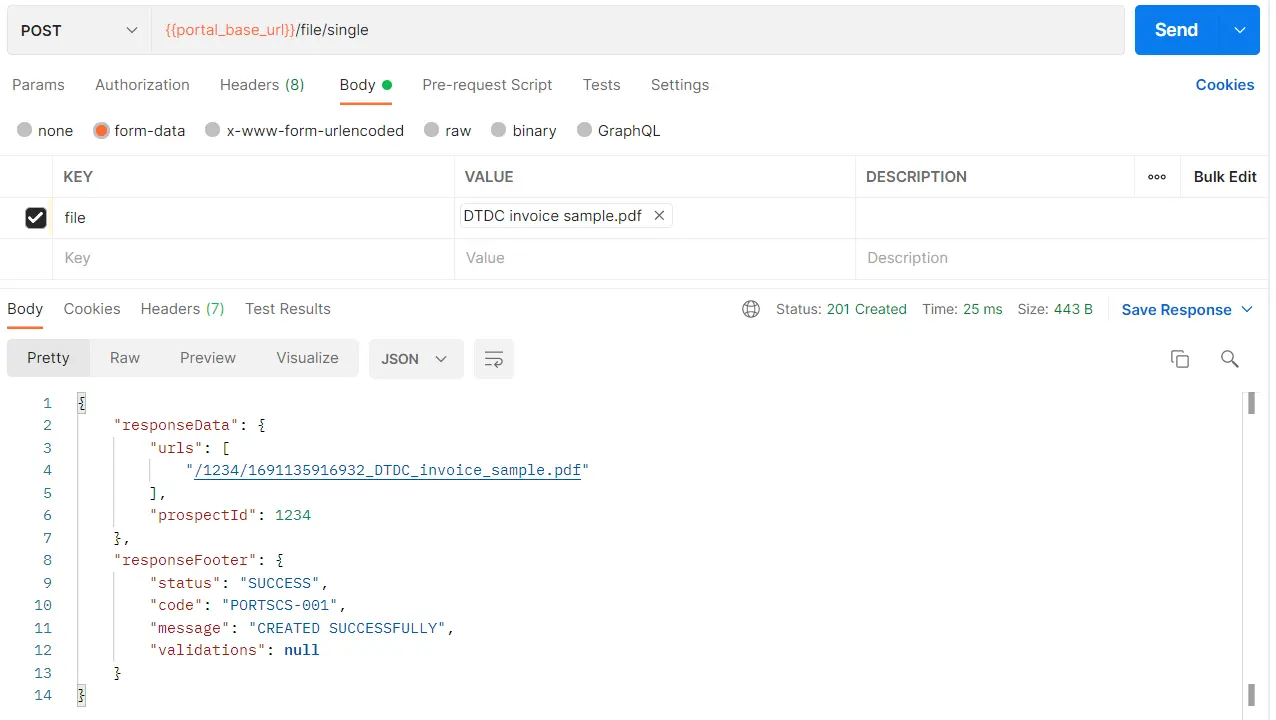
Upload single and multiple files using Node.JS and Nest.JS
Conclusion:
In this blog post, we explored how to handle single and multiple file uploads using Node.js and Nest.js. We used the multer middleware to facilitate the file upload process and provided examples of creating endpoints to handle these scenarios.Remember that file uploads require careful consideration for security and validation. In a real-world application, you should implement additional measures like file type validation, size limits, and proper error handling.
Feel free to extend this example by integrating cloud storage services like AWS S3 or Google Cloud Storage for scalable and reliable file storage. Happy coding!
Related Keywords:
File upload | NestJS - A progressive Node.js framework
Handling Multiple File Uploads with NestJS
Uploading Files to a NestJS Backend
How To Create NodeJS File Upload in NestJs and Fastify
The Easiest Way to Upload Your Files to NestJS
Complete Guide To Upload Multiple Files In Node.js and Nest.js
Support our IDKBlogs team
Creating quality content takes time and resources, and we are committed to providing value to our
readers.
If you find my articles helpful or informative, please consider supporting us financially.
Any amount (10, 20, 50, 100, ....), no matter how small, will help us continue to produce
high-quality content.
Thank you for your support!
Thank you
I appreciate you taking the time to read this article. The more that you read, the more things you will know. The more that you learn, the more places you'll go.
If you’re interested in Node.js or JavaScript this link will help you a lot.
If you found this article is helpful, then please share this article's link to your friends to whom this is required, you can share this to your technical social media groups also.
You can follow us on our social media page for more updates and latest article updates.
To read more about the technologies, Please
subscribe us, You'll get the monthly newsletter having all the published
article of the last month.




![Implement Kafka Module with AWS Secrets Manager in NodeJS with TypeScript [Modularized Code] Implement Kafka Module with AWS Secrets Manager in NodeJS with TypeScript [Modularized Code]](../../../images/node/426_kafka/426_kafka_1.webp)


